


Diptera.info :: Miscellaneous :: The Lounge
 Photos of captured insects
|
|
| crex |
Posted on 01-06-2006 09:59
|
 Member Location: Sweden Posts: 1996 Joined: 22.05.06 |
It seems some of you use a kind of box to take pictures of (temporaily?) captured flies!? It looks like Black uses such a thing because the background on many photos are the same. Any tips on how such a box should look like or be made? Or other tips on how one can take photographs of captured insects whitout damaging them and to get good lighting conditions etc. Sorry for all newbie questions ;) |
|
|
|
| Dmitry Gavryushin |
Posted on 01-06-2006 11:31
|
|
Member Location: Moscow region, Russia Posts: 3348 Joined: 17.10.05 |
Hello crex, Well it's been a while since I started my experiments with shooting insects indoors (it was exlusively beetles initially) and now I can share some of my experience with you (and everyone interested of course). 1. Some sort of box. The easiest way to do it sometimes is using the same container you put a specimen in when collecting it. I'd suggest milk-white Konica/Fujifilm plastic film containers and/or their caps (for very small flies). Put it on a sheet of white paper or something of uniform colour. Some flies rest for sime time on wall of an open container or immediately clean themselves upon leaving it thus allowing you some precious seconds to capture their looks. The container's size will let you shoot some flies directly inside sitting on its bottom, just push your lens closer and ajust your flash position (works OK at RRs around 2x). Be prepared to hop about your place to catch a runaway, leave them as few places/little space to hide as possible and/or just a single light source to attract fugitives (let it be a kitchen window for example). 2. Other backgrounds. The main task seems to be temporarily restricting object's motility without killing it so almost everything you can think out would do if it yields good results. I sometimes use some other plastic containers of different sizes, both transparent, semi-transparent, milk-white or white. Some examples: 5-litre drinking water bottles, rectangular in section, their cut-off bottoms with its front wall quite low to allow manipulations with your camera at a very short shooting distance; separately purchased containers (or their lids) for smetana (a product I believe you Western people are rather unfamiliar with yet quite popular here in Russia, like cream); white plasic toothpowder boxes/their lids, etc. Note: their surface should be even and smooth, without ridges or rifles or the like (actually most of such containers have some grooves, pressing marks, etc., but some portions of its surface might be usable). And keep them perfectly clean, or you'll see nasty dust particles on your pictures! Then you will have to do some trial and error routine to find lighting conditions that suit you best - just feel free to investigate, play with illumination sources, reflecting surfaces, flash position angle, etc. Just one thing more - depending on its thickness/transparency and ambient lighitng conditions, plastic can diffuse light very effectively softening hard shadows like almost nothing else, which hopefully may result in some fantastic shots. 3. Other (more naturally-looking) backgrounds. I mostly use leaves (green or dried, depending on season), pieces of bark, (very fine) sand, pieces of wood, and sometimes slates (excellent uniform grey BG for some objects). There's some basic hints. Using leaves, avoid very shiny thick ones (bad reflections) and/or covered with hairs, as well as with too many nervures (too many details, you'd lost your fly on it). Avoid using bark of too dark colour. Birch bark is very attractive background and may give great results, just remember it's very reflective and working with it is sometimes rather unpredictable. Sand is good sometimes, too, but remember its grains tend to stick to insects (and, even with fine sand, may be of the size comparable with that of your objects), keep it dry. 4. Finally, object movements. I use my fridge to temporarily slow them down while keeping them alive and kicking. I mean the freezer of course, most Diptera are quite tolerant to higher temperatures and would fly away almost instantly upon release. Freezing time varies greatly and depends on insect's kind/size, usually a couple of minutes would do, but it's a fragile balance, so be prepared to a lot of mournful sights of unnatural poses and legs clenched pitiably in their (inadvertent) death-throes. Some of them might look quite dead but just give them some time to warm up a bit while keeping an eye (well-equipped with your shooting device of course) on them. And remember, the farther your fly is from your substrate (the stronger it straightens out its legs) the softer shadows you'll get. Think that'll do for a start. Best regards. Edited by Dmitry Gavryushin on 01-06-2006 11:32 |
|
|
|
| crex |
Posted on 02-06-2006 07:28
|
|
Member Location: Sweden Posts: 1996 Joined: 22.05.06 |
Thank you for all the tips. I'll see what I can find to use ... |
|
|
|
| Susan R Walter |
Posted on 13-06-2006 13:33
|
 Member Location: Touraine du Sud, central France Posts: 1802 Joined: 14.01.06 |
I'm glad someone has started this discussion - some good tips there Black, although I bet there is a good deal of hopping about your kitchen! Until recently, I was cooling flies in the fridge to slow them down. They need minimum half an hour, with carefully timed stints in the freezer of about 45 seconds at a time if still too active to be photographed. Use a digital kitchen timer and a bit of practice to ensure minimal 'mournful sights'. You can also sit the 'prepared' fly on a freezer block whilst photographing, so it stays cool (towel underneath is sensible, as the freezer block will make quite a wet patch on your work surface). My usual method was to transfer the fly from its specimen tube into a lid from a sauce bottle (Chinese style sauces come in bottles with lids just the right size here in England - about 40-50mm diameter and 5-7mm deep). I lined bottom and sides of the lid with pale blue paper, also a good background colour for many species. To minimise having to hop around too much I then stretched plastic food wrap over the lid. If you have been dexterous, the plastic food wrap is almost invisible. You need to use a good quality one, which doesn't have too many permanent wrinkles that won't be stretched out. You need to use a piece that is not too big or you get an annoying lump underneath the lid which prevents it sitting flat and makes your photography harder. It can also attract a lot of fluff, so you need to be careful not to let it touch other surfaces. If you have not been dexterous and your fly escapes, a battery powered pooter (suction device) is useful, especially when you have high ceilings. These are sold as implements for safely catching wasps and spiders in the house, and are not particularly expensive. The less artificial light you can use the better, as the heat from the light will warm the fly up very quickly. The disadvantage of this technique is that you are usually restricted to dorsal or ventral views. It can be quite tricky getting a lateral view without getting too much of the lid in the shot, or too much shadow - although it is sometimes possible. I have used past tense to describe my use of this technique because lately I have been so busy that I am not photographing specimens the day they are collected. I am now having to freeze them until I have the time to do them, and for dead flies, it is much simpler. I use completely natural light and the longest possible exposure for the amount of light to get the best possible depth of field. When I am using this technique I link the camera to a television set to improve my view for focusing and so on and trigger the camera remotely. I sit the fly on an upturned petrie dish set on a piece of white paper so that its shadow falls underneath it and outside of the range of the photograph. It is very important to set your white balance if using a digital camera too. I almost never take 'in situ' shots of flies in their natural habitat, as I usually can't be bothered carrying a camera around along with all the other gear that seems to be necessary in the field. Also, I find having to take photographs interferes with my observing. Whenever possible I prefer to just point at a fly and request a companion to photograph it. Susan |
 |
|
| Tony T |
Posted on 17-02-2007 16:11
|
|
Member Location: New Brunswick, Canada Posts: 664 Joined: 08.02.07 |
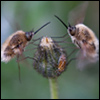
DOF can be increased by using a small aperture (large f-stop). To get even greater DOF I am experimenting with Helicon Focus software. This software will merge several images taken at different planes to produce a single image. The program can be downloaded as a free trial; but it places text across the center of the image as in my examples. This text is removed when one purchases the software. Note the DOF in this fly, the fly is 12.5 mm long and the distance from wing tip to wing tip, in this image, is 12.3 mm. The software can also handle macrophotography - see head shot. Useful if one needs to show great detail of a part of a fly for identification purposes. The method is not practical for field use and is best suited for dead insects; any movement of the insect between images will upset the final focus. Tony T attached the following image: 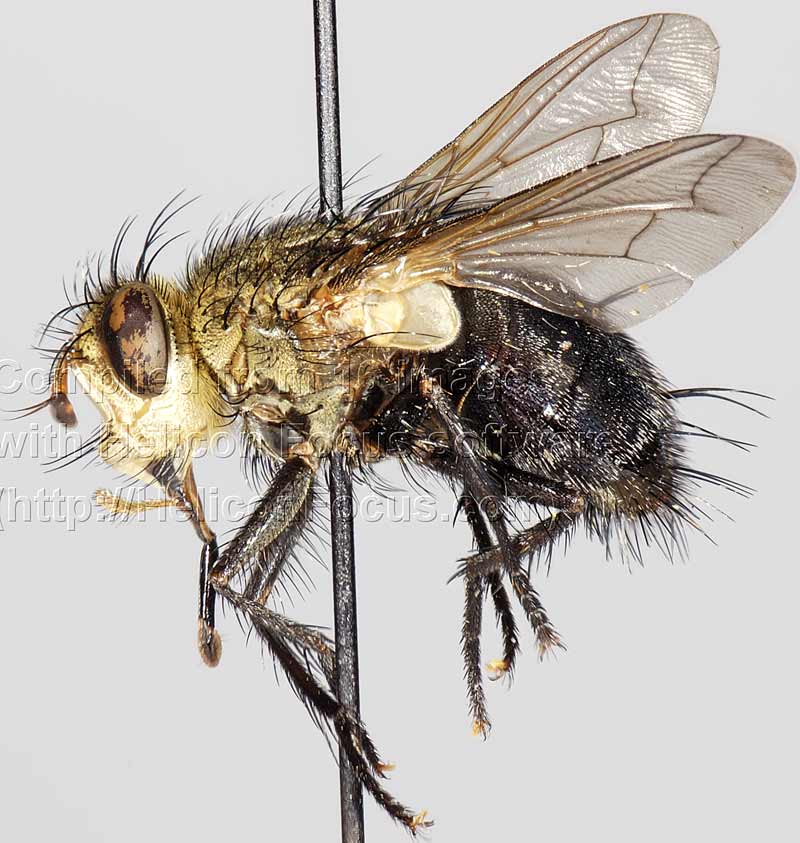 [84.9Kb] |
|
|
|
| Tony T |
Posted on 17-02-2007 16:12
|
|
Member Location: New Brunswick, Canada Posts: 664 Joined: 08.02.07 |
Head shot of same fly using Helicon Focus (free trial)
Tony T attached the following image: 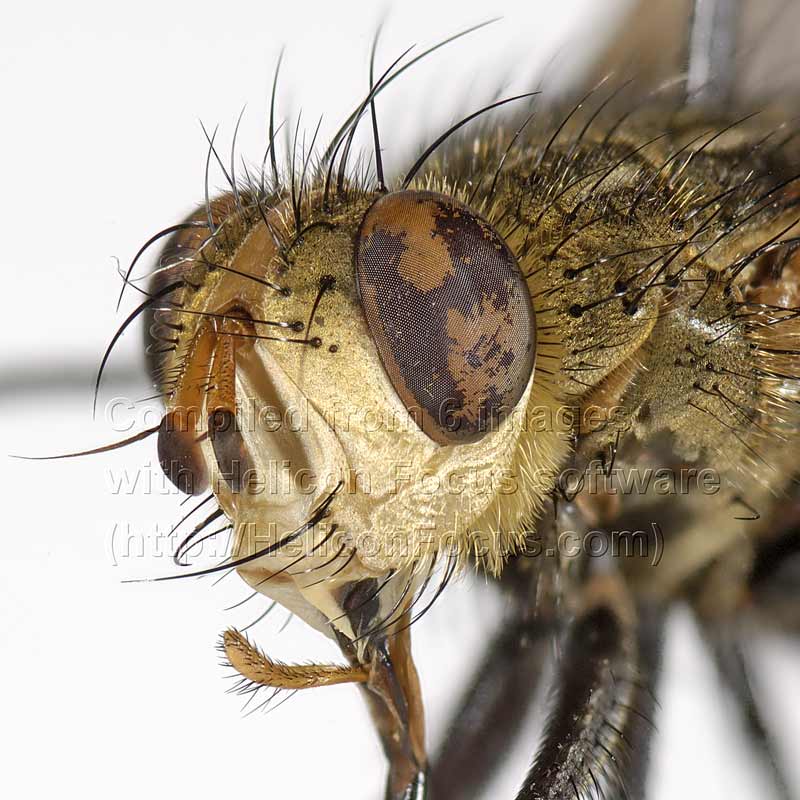 [80.72Kb] |
|
|
|
| crex |
Posted on 18-02-2007 00:27
|
|
Member Location: Sweden Posts: 1996 Joined: 22.05.06 |
A pity I don't collect the insects. This looks good. Is it hard to estimate the distance between the planes or perhaps it is not important that the photos are from even distances? It would be nice if the DSLR had a program for this so you just told the first and the last distance and it calculated the others evenly across the distances ... |
|
|
|
| pierred |
Posted on 18-02-2007 07:20
|
 Member Location: Paris (France) Posts: 1484 Joined: 21.04.05 |
Hello, There is another program, called CombineZ : http://www.hadley...der.co.uk/ I think it is free. Pierre Duhem |
|
|
|
| Paul Beuk |
Posted on 18-02-2007 07:24
|
 Super Administrator Location: Netherlands Posts: 19403 Joined: 11.05.04 |
Tony, two questions: Is the program easy to use? and What does one have to pay for a license?
Paul - - - - Paul Beuk on https://diptera.info |
|
|
|
| crex |
Posted on 18-02-2007 12:28
|
|
Member Location: Sweden Posts: 1996 Joined: 22.05.06 |
Paul Beuk wrote: Tony, two questions: Is the program easy to use? and What does one have to pay for a license? Helicon Focus licenses. |
|
|
|
| Tony T |
Posted on 18-02-2007 15:46
|
|
Member Location: New Brunswick, Canada Posts: 664 Joined: 08.02.07 |
The Lite version at $115.00 seems to be the best bet. Can always upgrade to the Pro version, but I have not yet had to use the added "retouching functions". Very easy to use, totally automatic. Difficulty lies in getting the original images. Have to have a very stable setup and a focussing rail that will move either the camera or the subject in small increments, perhaps sometimes less than 1 mm. The full fly shot was 16 images, the head shot 6 images. |
|
|
|
| Paul Beuk |
Posted on 18-02-2007 17:54
|
|
Super Administrator Location: Netherlands Posts: 19403 Joined: 11.05.04 |
Also see http://www.dipter...post_22128 for further CombineZ issues.
Paul - - - - Paul Beuk on https://diptera.info |
|
|
|
| Tony T |
Posted on 14-09-2007 22:23
|
|
Member Location: New Brunswick, Canada Posts: 664 Joined: 08.02.07 |
See HERE for links to macro techniques and HERE for detailed description and HERE for my set-up Edited by Tony T on 14-09-2007 22:25 |
|
|
|
| Tony T |
Posted on 19-03-2008 16:55
|
|
Member Location: New Brunswick, Canada Posts: 664 Joined: 08.02.07 |
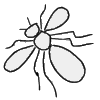
Close up photography is perhaps best done using a DSLR + a true macro lens + extra extension. The Nikon 105mm macro lens cost around $1000.00. A cheaper way to get large images is to use a wide-angle lens, mounted in reverse on extension (either tubes or a bellows). This face of a Pollenia was shot using a 28mm wide angle reversed onto 60mm of extension and mounted onto a DSLR. The quality is as good as that obtained from a true macro. The cost is still high but significantly less than the 105mm, i.e., $250.00 new. I suspect a used lens could be obtained for much less. Multiple images stacked with Helicon Focus. Tony T attached the following image: 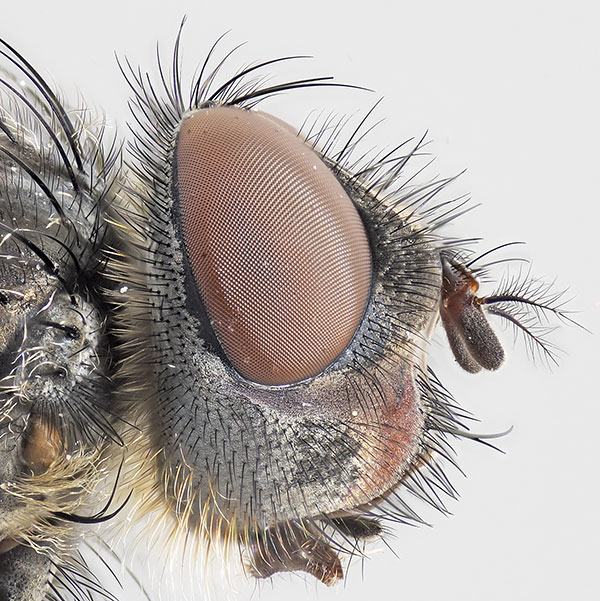 [121.71Kb] Edited by Tony T on 19-03-2008 16:56 |
|
|
|
| Tony T |
Posted on 19-04-2008 17:35
|
|
Member Location: New Brunswick, Canada Posts: 664 Joined: 08.02.07 |
Tony T wrote: See HERE for links to macro techniques and HERE for detailed description and HERE for my set-up Fly macrophotography. A few people have wondered how I obtain detailed photos of flies. I will try to describe the techinque - see all of the above. But now I use a better specimen mover - see below. [Note: this technique is applicable only to an indoor setting and with perfectly still (e.g., dead) fly.] The most critical factor is to be able to move the fly in a smooth linear axis in increments as small as 0.05mm. I have tried several camera "focussing rails" but these have proved unsuitable. I now use a Proxxon Micro Compound Table (Milling Table) HERE. Should be available in Europe. This piece of equipment allows for smooth movement in both x- and -axes. Some Machinists linear tables are more accurate, can make movements in the 0.01mm range, but more expensive. My table has been modified to hold a small ball head and a focussing rail for making adjustment in the z-axis. This is where the fly is placed. Modifications: Wooden block; 3" diam rubber wheel, makes for easier rotation; plywood base; ball head; vertical focussing rail fits onto ball head. Also needed is some form of 'optical bench'. The milling table is mounted on one end, the camera on the other. I use a "camera bar" from Really Right Stuff. I can slide the milling table along this rail to move the table closer to the camera. Tony T attached the following image: 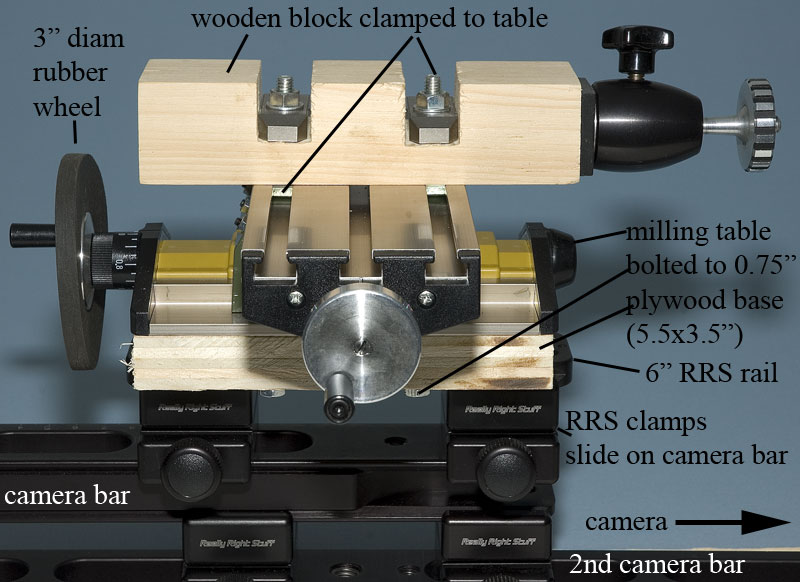 [90.98Kb] |
|
|
|
| pierred |
Posted on 20-04-2008 06:47
|
|
Member Location: Paris (France) Posts: 1484 Joined: 21.04.05 |
I find this is a good idea to switch away from so called photographic rails and to use a three-axis milling table. Could you show us a picture of the whole arrangement?
Pierre Duhem |
|
|
|
| Tony T |
Posted on 20-04-2008 15:24
|
|
Member Location: New Brunswick, Canada Posts: 664 Joined: 08.02.07 |
pierred wrote: I find this is a good idea to switch away from so called photographic rails and to use a three-axis milling table. Could you show us a picture of the whole arrangement? Same as HERE but with the milling table replacing the focussing rails. An example: 18 April 2008, New Brunswick, Canada The final photo of the face is from a stack of 20 images merged into 1 image using Helicon Focus. The free software, Combine ZM, does an equally good job. I have selected 4 images from this stack. The first image (#1) has just the arista in focus, the last image (#20) has the front of the thorax in focus. Intermediate images have other features in focus. The images were taken at intervals of 0.1mm; the fly mounted on the Proxxon table. I am really impressed by what these image-stacking programs can achieve. Tony T attached the following image: 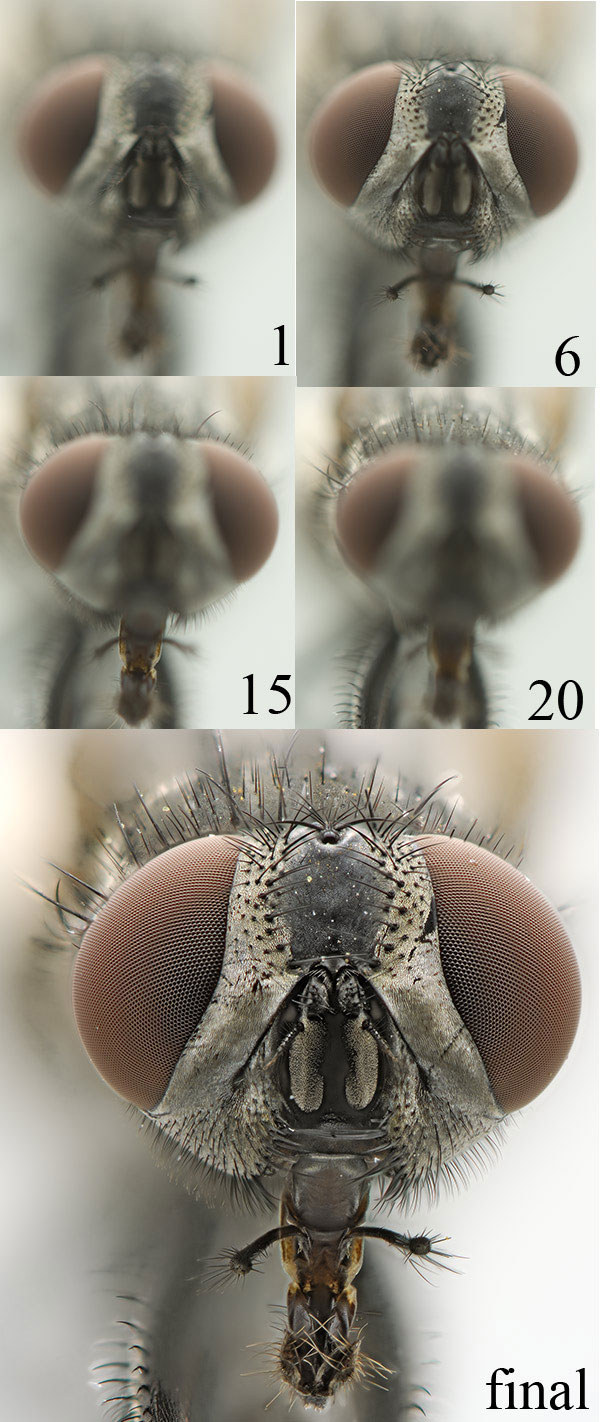 [174.1Kb] |
|
|
|
| Jump to Forum: |